Patch exif data for Sigma Lens

Non Canon lenses can be great or even better than the one provided by Canon itself (i.e the Sigma 50mm f/1.4 DG HSM Art). The only problem you have is that theses lenses are not natively recognized by your camera body. In Adobe Lightroom instead of getting a nice description of the lens used to shot the given picture as you can see below

EF50mm1_2

you get a super generic info like 50mm as you can see below

DG50mm1_4

This is of course not nice at all and we should be able to do better than that.

Ideally you should be able to tell Lightroom to overwrite meta-data during import and replace them by some new ones. Lightroom is however unable to do that. It’s equally unable to run any king of user defined script after import. The solution comes from Automator. I have experienced with folder actions and it was no good. Action may take far to long to be triggered (sometimes more that two minutes after folder modification) and, worse than all, modifications are lost after reboot. So I decided to go for a automator service workflow.

This workflow use a command line tool called ExifTool and can be called either on a folder or on a file. It logs in selected folder or at the same place as the processed files. It only modify the tags of corresponding files (so no need to remember which picture was taken with which lens). I recommand you not to modify directly the file on the SD card because if something goes wrong your original are gone. Instead I personally first copy the picture to a staging folder, call the service and finally import into Lightroom. In theory you could import and then call the service, but this will be awfully slow because all of the files in the same folder would be checked against the filter “Sigma”. On top of that you would also have to re-synchronize you Lightroom library as the Exif data are only read during import.

All that being said here’s the Automator workflow:

wf_screenshot

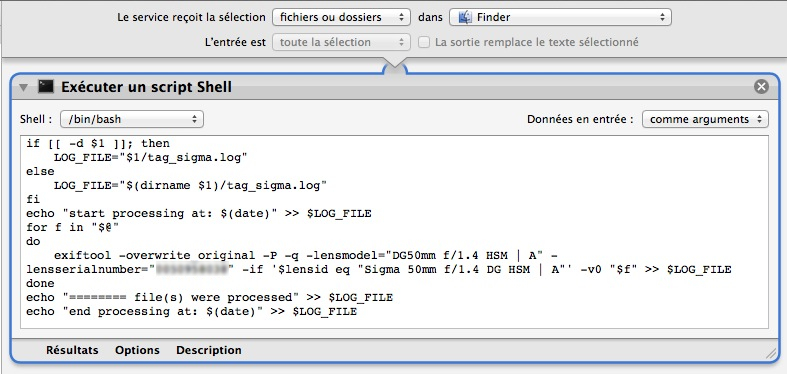
and the bash shell script code:

1
2
3
4
5
6
7
8
9
10
11
12
if [[ -d $1 ]]; then
	LOG_FILE="$1/tag_sigma.log"
else
	LOG_FILE="$(dirname $1)/tag_sigma.log"
fi
echo "start processing at: $(date)" >> $LOG_FILE
for f in "$@"
do
	exiftool -overwrite_original -P -q -lensmodel="DG50mm f/1.4 HSM | A" -lensserialnumber="XXXXXXXX" -if '$lensid eq "Sigma 50mm f/1.4 DG HSM | A"' -v0 "$f" >> $LOG_FILE
done
echo "======== file(s) were processed" >> $LOG_FILE
echo "end processing at: $(date)" >> $LOG_FILE

As you can see the script also tags the lens serial number (see “XXXXXXXX”) which is otherwise reported as “00000000” and is specifically looking for the DG 50mm 1.4 HSM Art lens. It can however easily be modified to match your own lens(es).

Script: tag_sigma_exp.workflow

Paralles Desktop 4

The software that I’ll definitively not recommend you. The question is why? Because:

  • With version 3 and 4, I were not able to use it easily with my bootcamp partition (see here).
  • The support was with version 3 non existant (an email posted on 8 july 2007 is still unanswered) and with version 4 still have no clue, after more than 6 months of availability, of basic problems.
  • The company does not seems to improve its product but to add as much as possible features even if still in “beta” stage.
  • The software engineers still don’t know to programm an application that is location independant.
  • The software engineers aren’t able to write meaningfull error messages

image1lauWhat do you think that such a message can be meaning. Of course that the location of your currently installed application is not ok.

In any case I would recommend you to use VMWare that works a lot better (according to my test) or VirtualBox.

Virtual box is becoming definitively an interesting alternative. It’s free, it works without hitch with Windows 7 and Open Solaris. The only point is that you cannot move the application away from the /Application directory (yes it’s one reason because I dismissed Parallels, but VirtualBox is free and comes from Unix System).

Seagate’s customer support

As preamble it should be noted that Seagate had the last time huge problem with some of its hard drive firmwares (read more here or here).

Hopefully I have no Seagate hard drive in my MacPro, but I had a doubt wether the drive in my LaCie d2 Quadra is a Seagate or not. The only possibility I had was to open the case and see the label on the hard drive itself. I let you guess what I see on the label. Bingo you named it Seagate.

And this is were it become interesting. As I was aware of the problem I directly went to the Seagate support web site to check if my hard drive (with the product number and the serial number) was concerned. Both the serial and product number check told me that my hard drive was concerned. I then follow the pretty complex guide in order to upgrade the fimrware. After some amount of time the updater says that my firmware cannot be updated.

Of course I take contact with the customer support in order to determine if my drive was affected or not. Here’s their first answer after 4 days:

Dear Jerome Paschoud

Thank you for sending your Seagate E-mail inquiry.

I apologize for the late reply. I am going to refer your e-mail to one of our Team Leads for information on whether this specific drive can be updated or not. They should be in contact with you shortly. Thank you for your patience.

Regards

The short period was of course not so short and after 20 more days I send once againg an email asking for an answer to my problem. Here’s the answer:

Hello Jerome,

You will need to contact the original place of purchase for any support on your specific drive. If further assistance is needed please let us know.

Regards

Conclusion:

  1. It tooks nearly a month to Seagate support to tell me that they can do nothing for me.
  2. After nearly a month I still don’t know if my drive is affected or not (that is, I still don’t know if I can use/trust it)
  3. The promise that they will answer my question is not fulfilled
  4. I’ll never ever buy anymore a Seagate product.

Dump maps from your Garmin to your Mac

I recently bought for my parents a new automotive GPS: the Garmin nüvi 765T. It comes with pre-loaded maps (in my case western europe) and I naively thought that the same maps will be also available on your computer. Unfortunately this is not the case, that is, the maps you get on your GPS aren’t available on your computer. You neither have the choice to dump them from your device nor to download them freely from Garmin.

In two words:”It sucks”

But, as you know, the answer it’s not possible, forseen is not enought to prevent me from trying, and, this time, with success (yeah I’m not that masochist to report my failure).

The only drawback is that currently the generated map is not “searchable”, that is, you cannot enter an address and have it displayed on your map.

Prerequisite

Windows side: dump (adapted from sorcieremonique’s forum)

  1. Create a temporary directory (for example C:/temp/garmin)
  2. Run the Free cGPSmapper installer (FreeSetup.exe)
  3. Move the cgpsmapper.exe and sendg.dll to the temporary directory
  4. Extract the content of wgmaptool040.zip to the temporary directory
  5. Extract the content of MapSetToolKit_v1.50.zip to the temporary directory
  6. Connect your Garmin to your computer with the USB cable
  7. Copy the gmapprom.img file from you GPS (located in the Garmin directory) to your temporary directory
  8. Wait as this might take a long time, in my case the file is 1,52 Gb in size
  9. Start GMapTool.exe:
    • Files tab: choose the gmapprom.img file you copied in step 7
    • Options tab: set correctly the path to cgpsmapper.exe
    • Split tab: choose an ouput directory (in my case C:/temp/CNEURONT2009), select create “files for MapSource”, check “Compile preview map”” and click the “Split all” button
  10. Wait as this might take a long time. You end up with a directory containt a lot of .img file
  11. Start MapSetToolKit.exe
    • Check the “install in Mapsource” checkbox
    • Click the install button. A new window appears
    • Set the path to the TDB file (in my case C:\temp\CNEURONT2009\mapset00.tdb)
    • Set the path to the Overview map (in my case C:\temp\CNEURONT2009\mapset00.img)
    • Set the path to the TYP files (in my case C:\temp\CNEURONT2009\I000017A.typ)
    • Fill the Registry name field with a sensible name
    • Click the install button

Windows side: convert

  1. Install Garmin MapSource software (as the only download provided is only valid for update you have to trick the installer as follow)
    • Install WinRAR
    • Unrar the content of MapSource_6141.exe
    • Run the MAIN.msi from the extract directory
    • Start the Setup.exe and install the software normally
  2. Start MapSource
  3. In Menu “Utilities” open “Manage Map Product”
  4. In the newly opened window go to tab “Unlock Regions” and click “Add”
  5. In the Garmin website, navigate to “myGarmin” and enter you login and password
  6. Navigate to the “myMaps”, “Manage Maps” and select you device in the drop down list if necessary
  7. In the section “Maps installed on this device” you should find your “Unlock Code”. Jot it down
  8. Back to MapSource copy the unlock code in the first field and click ok
  9. Start MapConverter, click “Next” till you get to the point where you can chose the map you want to convert. Select the one you want to convert and click “Next”. Choose a destination and click “Next”. If you don’t have space problem choose “No” for the compression and click “Next”. Wait for the conversion to finish.
  10. Copy the .gmapi file to your Macintosh

Macintosh side: install

  1. Double click the .gmapi file that you copied from Windows, this opens the Garmin MapManager
  2. Click the “Install” button and when finished “Quit”
  3. Start Garmin RoadTrip, in the upper right corner of the window you shoud now be able to select the newly imported map.

Ubuntu 8.10 on a PowerMac G4 450 mhz

After buying a new MacPro and giving the old PowerMac G5 to my mother, I had a spare machine with no clearly defined role. I choose to give a try to Ubuntu on this PowerMac G4 450 Mhz.

This machine is now an 9 years old, but I never had any problem with it except that I had to change the power supply.

My previous experience of installing Ubuntu on an old Mac was performed on an PowerMac 7500 and was far from successful. This time I had no problem at all to install it.

Step-by-step guide

  1. Download the latest Ubuntu release for PowerPC (currently 8.10 Intrepid Ibex), be carefull to choose the alternate install CD (the other download is server version without a GUI)
  2. Burn the CD
  3. Start the Mac with the option(alt) key pressed down and insert the CD in the CD-ROM drive
  4. Choose to boot on the CD (the icon with the CD and a small pinguin on the bottom left)
  5. Follow the on screen indications
  6. I had a problem during the installation when the installer tries to detect my CD-ROM drive. In order to circumvent the problem I had to issue the following command in the second terminal (you access it with option+F1 key combination): modprobe ide-scsi You should ear the CD spinning in the drive and by restarting this step of the install this should go through.
  7. Take a break, the installation now goes till this end without a problem but last in my case 1 hour.

That’s it. As you see there’s no major challenge in this operation.

SVN on NSLU2

Goals

  • Have a central repository at home that manage the code I produce
  • Use material that I allready had or that is inexpensive
  • Consume minimal power

Hardware

Disclaimer

As always if something goes wrong and you destroy your hardware or lose some data, I cannot be held responsible. This said it worked for me 😉

Prerequisite

Your NSLU2 is correctly configured for your network. That is in the Web Interface under Tab Administration, sub-tab LAN, the IP address, network mask, gateway and primary DNS server fields are set.

Step-by-step guide

Installing the modified firmware:

  1. Download the latest Unslung firmware (currently 6.10 Beta)
  2. Install UpSlug2 on your Mac. If you don’t know how to install UpSlug2, on Mac follow the directions given here
  3. You can find the UpSlug2 under the following path /usr/local/sbin
  4. Shutdown the NSLU2
  5. Press and hold the reset button and at the same time press the power buton
  6. At the moment when the Ready/Status LED turn solid red, release the reset button
  7. You know that the NSLU2 is in upgrade mode when the Ready/Status LED in blinking red and green
  8. If you have more that one network interface (for example one ethernet and one wifi), you have to determine the one you use to connect to your NSLU2 (use ifconfig to see which interface get the ip address from your DHCP server for example)
  9. sudo ./upslug2 --device en0

    You should see your NSLU2 listed. (As mentionned in point 8 the --device is only needed to specify your network interface)

  10. Flash the NSLU2 with the Unslung firmware
    sudo ./upslug2 --device en0
    --image="/<path_to_the_firmware>/Unslung-6.10-beta.bin

Installing the necessary packages on the NSLU2:

  1. In the Web interface under tab Administration, sub-tab Disk (accessed by cliking on the Advanced sub-tab), format the USB2 flash key by cliking on the button Format Disk 2
  2. You know have to move the data from the internal flash to your USB flash key. This operation is called unslinging. In the Web interface under Tab Home, sub-tab Manage Telnet, click the button Enable Telnet
  3. Telnet your NSLU2 with the login “root” and password “uNSLUng”
  4. Enter
    unsling disk2

    and give a new password for the root account

  5. Reboot and reactivate telnet as described at point 2
  6. Telnet the NSLU2 and perform the
    ipkg update
  7. Install openssh so you don’t have to use telnet anymore
    ipkg install openssh
  8. Logout and login with ssh. Now you don’t have to enable telnet anymore. From now on we’ll use ssh that is more secure
  9. In the Web interface under tab Administration and sub-tab Users create a new user that is named “svn”. Be sure that you have checked the Create Private Folder (Share) check box
  10. Back to the ssh session install svn
    ipkg install svn
  11. If you’re lazy like me and don’t know how to use vi then install nano
    ipkg install nano

Configure SVN:

  1. Create the /svn/repositories directory with
    mkdir /svn/diretories
  2. Prepare the svn repository for your project
    svnadmin create /svn/repositories/<projet_name>
  3. (OPTIONAL) If you want to migrate a previous svn repository, then copy via the svn share the dump that you produce with
    svnadmin dump <repos_path> > project.dump

    (on the old svn instance). In the NSLU2 perform a

    svnadmin load /svn/repositories/<project_name> < project.dump

    You can now delete the project.dump file.

  4. Edit the /svn/repositories/<project_name>/conf/svnserve.conf such that the following lines appears
    anon-access = none    #no anonymous can login
    auth-access = write   #authenticated user are allowed to write
    password-db = passwd  #use the passwd file for authentication
  5. Modify the /svn/repositories/<project_name>/conf/passwd file according to the example provided in the file
  6. Create a diversion script to start the svnserve deamon. We will make a /etc/rc.d/rc.svn diversion’s script with the following content
    #!/bin/sh
    
    /opt/bin/svnserve -d
    
    echo `date '+%Y/%m/%d %k:%m:%S'` " : svnserve start" >> /var/log/svnserve.log
    
  7. Correct the script’s premission with
    chmod ugo+rx rc.svn
  8. Add the svnserve to your startup sequence. In order to do so add the following line
    /bin/echo  "Starting svn server:"; ( . /etc/rc.d/rc.svn )
    

    to your rc.1 diversion’s script. You can put it almost anywhere in this diversion but I recommend put it near the end. In my case I have it after the start of the rc.bootdisk‘s diversion.

  9. Reboot the NSLU2 to see if your rc.svn is taken into account
  10. The URL to connect to your svn server is something like svn://<user_name_from_passwd>@<server_address>/svn\
    /repositories/<projet_name>

Additional informations:

  • You have access to the linux hierarchy via the shared element named ADMIN 2. If you use the standard admin/admin password you can see the file there but cannot modify them.
  • The public share is located at /share/flash/data/public and has a mount point in the unix hierarchy at /public. The same apply to the svn share.

RainbowCrack on Mac Intel

[upd2 30.03.2008]

Thanks to Erik Winkler there exists a Mac version of RainbowCrack. Not only this version support more hash algorithms than the official one, it also doesn’t require that you install openssl, it’s universal and last but not least it performs better than the one that I hack (see rest of the post).

I definitely recommend you to use this version instead of mine.

RainbowCrack at macunix.net

[/upd2]

Unfortunately there is no RainbowCrack Mac build.

Here at your disposition a release 1.2 build for intel processor Mac . It needs OpenSSL 0.9.8.g installed in order to work (and of course OS X comes with an earlier version [0.9.7.l]).

How to build by yourself:

OpenSSL 0.9.8.g

  1. download OpenSSL 0.9.8.g from http://www.openssl.org/source/openssl-0.9.8g.tar.gz
  2. open the archive and navigate with a terminal till the openssl-0.9.8g directory
  3. enter the following command ./configure shared
  4. enter the following command make
  5. enter the following command make test
  6. enter the following command sudo make install

RainboCrack 1.2

  1. patch the source file Public.cpp such as the procedure unsigned int GetAvailPhysMemorySize() looks like:
        int mib[2];
        int memSize;
        size_t len;
        mib[0] = CTL_HW;
        mib[1] = HW_PHYSMEM;
        len = sizeof(memSize);
        // This function is FreeBSD-specific
        sysctl(mib, 2, &memSize, &len, NULL, 0);
        return memSize;
  2. modify the makefile.linux such as instead of having the -lssl flag (that is pointing to the default installed 0.9.7.l version) you read:
    -L "/usr/local/ssl/lib/libssl.dylib"
    -L "/usr/local/ssl/lib/libcrypto.dylib"
  3. build RainbowCrack normally then

If I have enought time and motivation I’ll try to compile OpenSSL and RainbowCrack with the intel compiler and all the optimisations for the Xeon platform. Unfortunately as my preliminary tests tend to prove it is not a straightforward task.

[upd 23.03.2008] The source code of my modified version is now available: rainbowcrack-12-src.zip .

[/upd]

Leopard: The good, the Bad and the Ugly

Now that Mac OS X 10.5 (aka Leopard) is out and that finally installed it, let’s have a small review.

The Good

  • Networking seems to work a lot smoother than on previous version. The new arrived computer on the network are immediately displayed (also when it’s a PC).
  • SVN is now by default installed with the developer tools.

The Bad

  • No utility like Cocktail or OnyX are momentarily available.
  • The folder’s icons is awfull.
  • The icon in the window’s sidebar are too small.

The Ugly

  • NetInfo Manager has gone. You have to go to go to Directory Utility in Menu Edition to enable the root account and you have to go to the Account Preference pane and then perform an option + click on the account name to get to the Advanced Options in order to modify the default shell you use.

To survive

In a terminal for the transparency icon on dock when application is hidden:

defaults write com.apple.Dock showhidden -bool YES

double arrow are the each end of scroll bar:

defaults write "Apple Global Domain" AppleScrollBarVariant DoubleBoth

Logout and login to have the change taking effect.

To be updated …