How to use a proxy and force fetching the latest data

I just recently had a problem using a Java URLConnection behind a proxy and forcing the connection to get the latest available data on the server and not the one cached by the proxy. The following code snippet demonstrate how to do that.

10
11
12
13
URL metarUrl = new URL("ftp://tgftp.nws.noaa.gov:21/data/observations/metar/stations/LSGG.TXT");
Proxy myProxy = new Proxy(Proxy.Type.HTTP, new InetSocketAddress("www.myproxy.ch", 8080));
URLConnection metarConnection = metarUrl.openConnection(myProxy);
metarConnection.setDefaultUseCaches(false);

SVN on NSLU2

Goals

  • Have a central repository at home that manage the code I produce
  • Use material that I allready had or that is inexpensive
  • Consume minimal power

Hardware

Disclaimer

As always if something goes wrong and you destroy your hardware or lose some data, I cannot be held responsible. This said it worked for me 😉

Prerequisite

Your NSLU2 is correctly configured for your network. That is in the Web Interface under Tab Administration, sub-tab LAN, the IP address, network mask, gateway and primary DNS server fields are set.

Step-by-step guide

Installing the modified firmware:

  1. Download the latest Unslung firmware (currently 6.10 Beta)
  2. Install UpSlug2 on your Mac. If you don’t know how to install UpSlug2, on Mac follow the directions given here
  3. You can find the UpSlug2 under the following path /usr/local/sbin
  4. Shutdown the NSLU2
  5. Press and hold the reset button and at the same time press the power buton
  6. At the moment when the Ready/Status LED turn solid red, release the reset button
  7. You know that the NSLU2 is in upgrade mode when the Ready/Status LED in blinking red and green
  8. If you have more that one network interface (for example one ethernet and one wifi), you have to determine the one you use to connect to your NSLU2 (use ifconfig to see which interface get the ip address from your DHCP server for example)
  9. sudo ./upslug2 --device en0

    You should see your NSLU2 listed. (As mentionned in point 8 the --device is only needed to specify your network interface)

  10. Flash the NSLU2 with the Unslung firmware
    sudo ./upslug2 --device en0
    --image="/<path_to_the_firmware>/Unslung-6.10-beta.bin

Installing the necessary packages on the NSLU2:

  1. In the Web interface under tab Administration, sub-tab Disk (accessed by cliking on the Advanced sub-tab), format the USB2 flash key by cliking on the button Format Disk 2
  2. You know have to move the data from the internal flash to your USB flash key. This operation is called unslinging. In the Web interface under Tab Home, sub-tab Manage Telnet, click the button Enable Telnet
  3. Telnet your NSLU2 with the login “root” and password “uNSLUng”
  4. Enter
    unsling disk2

    and give a new password for the root account

  5. Reboot and reactivate telnet as described at point 2
  6. Telnet the NSLU2 and perform the
    ipkg update
  7. Install openssh so you don’t have to use telnet anymore
    ipkg install openssh
  8. Logout and login with ssh. Now you don’t have to enable telnet anymore. From now on we’ll use ssh that is more secure
  9. In the Web interface under tab Administration and sub-tab Users create a new user that is named “svn”. Be sure that you have checked the Create Private Folder (Share) check box
  10. Back to the ssh session install svn
    ipkg install svn
  11. If you’re lazy like me and don’t know how to use vi then install nano
    ipkg install nano

Configure SVN:

  1. Create the /svn/repositories directory with
    mkdir /svn/diretories
  2. Prepare the svn repository for your project
    svnadmin create /svn/repositories/<projet_name>
  3. (OPTIONAL) If you want to migrate a previous svn repository, then copy via the svn share the dump that you produce with
    svnadmin dump <repos_path> > project.dump

    (on the old svn instance). In the NSLU2 perform a

    svnadmin load /svn/repositories/<project_name> < project.dump

    You can now delete the project.dump file.

  4. Edit the /svn/repositories/<project_name>/conf/svnserve.conf such that the following lines appears
    anon-access = none    #no anonymous can login
    auth-access = write   #authenticated user are allowed to write
    password-db = passwd  #use the passwd file for authentication
  5. Modify the /svn/repositories/<project_name>/conf/passwd file according to the example provided in the file
  6. Create a diversion script to start the svnserve deamon. We will make a /etc/rc.d/rc.svn diversion’s script with the following content
    #!/bin/sh
    
    /opt/bin/svnserve -d
    
    echo `date '+%Y/%m/%d %k:%m:%S'` " : svnserve start" >> /var/log/svnserve.log
    
  7. Correct the script’s premission with
    chmod ugo+rx rc.svn
  8. Add the svnserve to your startup sequence. In order to do so add the following line
    /bin/echo  "Starting svn server:"; ( . /etc/rc.d/rc.svn )
    

    to your rc.1 diversion’s script. You can put it almost anywhere in this diversion but I recommend put it near the end. In my case I have it after the start of the rc.bootdisk‘s diversion.

  9. Reboot the NSLU2 to see if your rc.svn is taken into account
  10. The URL to connect to your svn server is something like svn://<user_name_from_passwd>@<server_address>/svn\
    /repositories/<projet_name>

Additional informations:

  • You have access to the linux hierarchy via the shared element named ADMIN 2. If you use the standard admin/admin password you can see the file there but cannot modify them.
  • The public share is located at /share/flash/data/public and has a mount point in the unix hierarchy at /public. The same apply to the svn share.

Installer SVN en local

M’Ă©tant mis en tĂȘte aprĂšs la lecure de The Pragmatic Programmer, je me suis dĂ©cidĂ© Ă  installer SVN en local sur mon Mac. Suite Ă  quelques recherches sur internet, j’ai fini par trouver trois trĂšs bonnes sources d’informations.

What’s coming for Leopard

leopard.jpg

All the fellowing informations are found in the WWDC 2006 state of she union conference that was firstmade available to ADC Online (registration is free) members the last week. Most of the items I’ll enumerate are not new for the ones that fellow the Apple actuality, but it’s good to see them all in one place and confirmed directly from Apple.

  • Not only the Unix layer but also the graphics, frameworks and Aqua are now 64 bits
  • New features to ease the use of multi-core machines (NSOperation & NSOperationQueue)
  • Objective-C will now have a garbage collection (the old reference counting can still be used)
  • Open-GL comes now in a multi-threaded fashion
  • Core Animation is improved with implicit animations and NSGridView (you have to see it to beleive it)
  • OS 10.5 will be resolution independant
  • Spotlight can now searche through the network
  • New system of preview that allows developers to chose what kind of preview a document should have (the same principle as for preview icons that are generated for pictures)
  • New system of help where not only the search explains you how to do things but also open the right menu for you
  • Time machine with its incremental backup

I must say that after looking at the video I wonder if I’m not goint to buy an ADC Select membership. I don’t know if Apple provide this video just to sell more ADC membership, if it was to make buzz around Leopard just when Vista is coming or for any other reasons that I can’t imagine, but I must admit that the quality of the stuff provided is amazing.

nil, Nil and NULL what’s the difference?

If you use GCC, you will most probably never ever see a difference between this 3 keywords and can use them interchangeably. If you use another compiler, if you just wonder or if you care about writing semantically correct code then just keep reading.

  • nil is a null object pointer, (id)0 [that is the number 0 casted to the type id]
  • Nil is a null class pointer, (Class)0 [that is the number 0 casted to the type Class]
  • NULL is a null pointer constant, (void *)0 [it’s a preprocessor macro defined by ANSI C]

Then be carefull to use only nil whith object and not with a numerical primitive type. Otherwise you could have some unpleasant suprises.
Source for Objective-C and for ANSI C, NULL is standardly defined in stddef.h

How to use Predefined Header

Did you ever wonder what was this single file called [YourProjectName]_Prefix.pch.

prefix_pch.jpg

Sure this look like a perfectly well formed Objective-C header, but did you ever try, for example, to use the #define precompiler directive in this file and then using the predefined keyword in one of your project’s classes. No Luck hey, it seems that this header is never read. Sound bizzare isn’t it.

The answer is simply that, for a reason I can’t understand Apple , just forgot to configure properly the project template. Then we have to do it by ourself. Just go to the Project menu and then select the Edit Active Target ‘[YourProjectName](see below).
menu.jpg

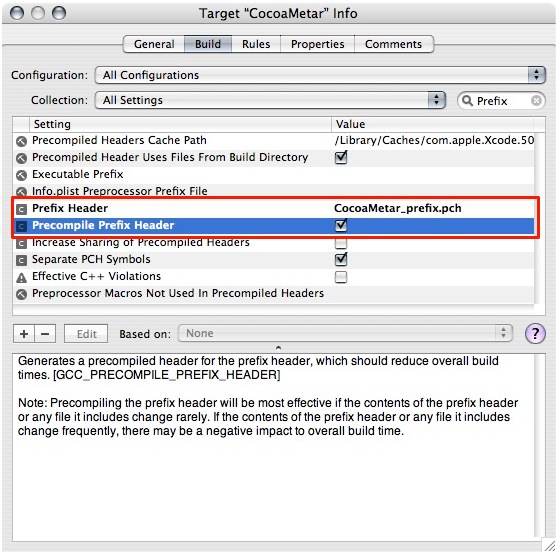
Finally correct the two Prefix build options such that it looks like below.
target_info.jpg

Now you’re done, enjoy the use of the centralized header.

It seems also possible to modify the template in order to have this options directly set. CocoaDev seems to be a good starting point for further investigations on the subject.

Regular Expressions in Objective-C

This class allows you to use very powerfull regular expressions (because it’s based on regexec from C) in an object oriented way.
Thanks to the post of David Teare, I finally find a very easy and powerfull solution for using regular expressions in Objective-C. David’s code only returns a boolean to indicate if the NSString was matching the given regular expression. I improve its method by returning a NSMutableArray with the different sub-expressions that lead to a match. Unfortunately I wasn’t able to return nil when the sub-expression doesn’t produce a match, instead I return the empty NSString @””.

Download Regular Expression Source Code

[Updated the 16.05.2007] Thanks to everybody for you remarks, I updated the source file accordingly. I also add a example script to demonstrate the use of the method.

Download Regular Expression Source Code version 1.1

[Updated the 01.01.2008] After receiving a reader’s mail about the code’s licencing, I clarify the situation and add the GPL licence in the header as well as the full licence in the package.

Download  Regular Expression Source Code version 1.1

[Update 22.02.2009] Hey I just discovered that TwitterFon, YMail and swisssms are using this class. Cool isn’t it.

[Updated the 08.04.2009] Bugfix the behavior when working on NSString with UTF8 encoded chars. Thanks to Ian Atha & soniccat for the correction

Download Regular Expression Source Code version 1.2